Thursday, December 20, 2012

Coachalicious Giveaway Ends 1/3

Mom Powered Media, connecting companies to consumers the super mom way!

Coach Legacy

Coach Legacy Signature Duffle Handbag in Silver {RV$298}

The beloved 1973 Duffle Sac is updated with a slimmer profile, decorative tassels and an adjustable crossbody strap. Crafted in our iconic signature jacquard, and richly trimmed with glove-tanned leather, it has the look and feel of classic Coach.

  • Signature fabric with leather trim
  • Inside zip, cell phone and multifunction pockets
  • Outside zip pocket
  • Zip-top closure, fabric lining
  • Strap with 18 3/4" drop for crossbody wear converts to double strap for shoulder wear
  • 9 3/4" (L) x 13" (H) x 5 1/2" (W)

Coach Legacy Wallet

Coach Legacy Signature Zippy Wallet in Silver {RV$98}

Tonal and textured in iconic signature jacquard, our popular, soft-sided design is framed with hand-finished leather trim and updated with an elegant enameled Legacy plaque.

  • Signature fabric with leather trim
  • Credit card and multifunction pockets
  • Full-length billfold compartments
  • Zip-top closure
  • Wrist strap attached
  • 7 3/4" (L) x 4 1/4" (H) x 3/4" (W)
  • A coach.com exclusive

Big thank you to Mom Powered Media partners: Mom to Bed by 8, Powered By Mom, Real Mom Reviews and Baby Costcutters for organizing this Coachlicious fashion event.

As well as our fantastic co-hosting blogs Mom Knows It All, What's Up Giveaways, Monica's Rants, Raves & Reviews, Keeping Your Cents, Mommy and Me Giveaways and Just Me and Davey.

Coach

One lucky winner will receive the Coachlicious Prize Package including Legacy Signature Duffle and Zippy Wallet.

Giveaway ends January 3rd, open to US and Canadian residents, ages 18+. To enter please use the Rafflecopter form below. Good luck!

Sunday, November 25, 2012

Free Coachlicious Giveaway Sign Ups 12/17

Coachlicious Giveaway Event hosted by Mom Powered Media

Prize: Coach Madison Op Art Sateen Handbag

Event dates: 12/17 - 12/31

Free Blog Event! Sign-up here, BLOGGERS WANTED

Tuesday, November 20, 2012

Put Down South Collection Under Your Tree This Year! (Giveaway!)


Down South Collection is a charming company specializing in comfy-cozy t-shirts started by a young college student named Allie, who gave breath to her dream of spreading southern comfort to people everywhere.

I have loved having the opportunity to work with her and learning more about her company. When I asked her to share with me a little about her vision, she gave me this statement:


"I'm a college student with a love for the South. When I dreamed up the idea of Down South Collection, my goal was to create a collection that encompassed all aspects of the South without targeting one specific audience. With Down South Collection, I chose the mantra: "Share the South". This saying allows each person to share their individual experience with the wonderful place we call home: The South. 
Growing this company is more than just a goal in my life that is meant to be achieved. The South is so much more than just a geographical location to me. It is embedded into my character. It makes up who I am. The love I have for how "The South" has shaped me inspires me to share my experience with others. If wearing my shirt brings a memory of hanging clothes out on the line on a crisp Spring day to someone, I would be thrilled. It's with that hope that I wish to share Down South Collection with everyone, everywhere."


I just love this vision that Allie has, and I am so glad she shared it with me. The South truly is such a wonderful place to call home!


Down South Collection sent me their long sleeved logo tee in "red dirt road" - don't you just love that color! It's so comfortable, warm, and stylish! Of course, being southern never goes out of style! I think one of my very favorite things about the Down South Collection selection is that their products are mostly unisex. I chose my t-shirt to be a size  bigger than normal, simply because I prefer my t-shirts to be big, and my husband can sport the shirt as well! Plus, they're comfort colors! Who doesn't love a comfort color t-shirt?!
Down South Collection has so many other cute options as well! Here are a few of my favorites:


They even have logo hats!

If you're looking for an awesomely comfortable and trendy tee to sport this season, I encourage you to check Down South Collection out! Their items will make wonderful Christmas gifts for anyone on your list!

Now, on to what everyone has been waiting for!
ONE lucky Settled Down in a College Town reader will WIN their own Down South Collection T-shirt! 
The winner will receive the same shirt that I did in "Gun Powder" gray!  How awesome is that?!

Contest is open to US readers only. The first entry is MANDATORY. Winner will have 48 hours to respond to winning notification before another winner is selected.

a Rafflecopter giveaway

I received a complimentary logo shirt in exchange for my review. All opinions expressed are completely my own.

Tuesday, November 6, 2012

LG Smart TV Giveaway! Just in time for the Holidays!

LG Smart Magic Bigscreen Giveaway Event

Please take a moment and visit our sponsor: Coupon Pro

Coupon Pro is your daily money-saving blog for the hottest freebies and coupons from top brands. We want to help you save the most on everyday items your family needs. Join us today!
Beauty and brains make magic together in this super-slim HDTV. Its edge-lit LED panel delivers a full HD picture with smooth images, even when watching fast-paced action movies. Smart TV technology brings the best Web-based entertainment content right into your living room over your home Wi-Fi network. Finally, make confusing controllers a thing of the past with the point-and-click convenience of the included Magic Remote — no sleight of hand necessary!
LG 42" Smart TV 1080p 120Hz Edge-Lit LED HDTV Features:
  • 1080p Full HD picture resolution
  • Edge-Lit LED design
  • Smart TV
  • Wi-Fi adapter
  • Magic Remote
  • TruMotion 120Hz
  • Triple XD Engine
  • Picture Wizard II
  • Intelligent Sensor
  • Clear Voice II
  • HDMI (High Definition Multimedia Interface) cable included

One lucky reader will receive a LG 42" Smart 1080p Edge-Lit LED HDTV with Wi-Fi and Magic Remote!

Giveaway ends November 26th at 11:59pm, open to Continental US residents, ages 18+. To enter please use the Rafflecopter form below. Good luck!

Monday, November 5, 2012

Need a great gift for the man in your life? UT-Wire has you covered!

Hello there! It's Kyle again!


As most men do, I've got a lot of gadgets.
Particularly electronic gadgets with long powercords that typically run to a powerstrip and become tangled with all the rest of my cables.

UTWire has a simple, durable, and fun solution to those tangled chords.
They're called Flexi Ties.


They're a great alternative to single use zip-ties and old bread ties.
For applications like powercords, extension cords, or headphones, these work great!
For permanence I would most likely use a zip-tie, not because these would not do the job, but because I can find something else that I want to use my Flexi Ties on!

Here's a simple example of my use of the Flexi Ties on our church sound equipment.

Before:

After:


I've owned a couple of different brands of these, but UT Wire stands out from the rest.
The outside material is soft, yet durable, and the wire inside is much easier to shape than their competition's product.

You can order the 5" & 7" for around $7 for a 6-pack.

They also have some have some cable management products call D-Wings, which you can see in the after picture. (They're the white clips attached to the table behind the mixer.)


They come in a pack of 18 (12 small & 6 large).
The large would be suitable for a heavy duty extension cord, and the small would work better for smaller wires like ethernet & power supplies.

There's lots of great ideas on their website UT-Wire.com
As a guy, I enjoy useful gifts and these would make great stocking stuffers for the gadget junky in your life!


Thursday, November 1, 2012

No Shave November? No thanks! (Giveaway!)

It's November!
(And it's the most wonderful time of the year, in my opinion!)

 When I think of November, I think of cool Fall air, pumpkin flavored sweets, yummy casseroles, football, and fluffy faces. Yep. You read that right. Fluffy faces.


Why fluffy faces?

Well...if you mustache...(ha ha)
It's "No Shave November!"

No Shave November is an annual tradition in which men voluntarily go the whole month without shaving their facial hair for prostate cancer awareness. Since this event first started in 1999, the meaning has seemed to become a bit diluted. It seems that many men accept No Shave November as more of a fun challenge than as a tool to raise awareness. Also, I secretly think some men just want to look like cave men. Who can blame them, really.

That's all well and good. I love the idea of participating in something fun to raise awareness for an important cause. However, recently while riding in the car, I overheard a discussion on the growing number of women participating in "No Shave November".

If that's your thing, I think it's awesome! If you're doing it to raise awareness, keep on trucking! As for me, though, I cringe at the slightest sign of stubble on my legs. Yuck yuck yuck! While I love No Shave November, I choose to keep my legs soft and smooth while cheering others on in their attempts to grow their facial hair.

I want to hear what other women think about No Shave November. Do you enjoy seeing "fluffy faces" around? Do YOU participate in this phenomenon? Do tell!

In honor of No Shave November, I'm giving away an awesome awesome Gillette Venus razor to one lucky Settled Down in a College Town reader!

Why?
Because it's ironic. And funny. And it's a really awesome razor. And I love my readers enough to give them cool, awesome, and ironic stuff. He he!


Besides, razors all over the globe are experiencing the loneliest month of their lives during No Shave November. If you want to show razors a little love and keep your legs smooth and soft this November, then I encourage you to enter!

The first entry is MANDATORY! All entries will be verified. US. entrants only.
One winner will be drawn at random, and the winner will have 48hrs to respond to their winning notification.


a Rafflecopter giveaway

I have not been compensated for this post in any way. All thoughts are completely my own, and the item being given away has come from my own personal funds. 

Friday, October 19, 2012

My Pinterest Fail: DIY Makeup Remover

Let's talk Pinterest again!


Pinterest is my favorite "hangout" online, and has given me SO many wonderful ideas and inspirations. It has also led me astray quite a few times. Many times the disaster was partly my own fault, but others were just a flat out nightmare waiting to happen.

Recently while browsing Pinterest, I came across a recipe for a DIY eye makeup remover that seemed so simple and budget friendly. My current supply of makeup remover was almost out, so I thought I'd give this recipe a try.

The recipe called for:
1c water
1 1/2 Tbsp baby shampoo (tear free)
1/8 tsp Baby oil

*Note* Baby oil is not necessarily the best thing to use on your face and is not recommended for people with oily skin. You can easily substitute the baby oil for olive oil. I continued with baby oil because this recipe calls for such a miniscule amount, and also my skin is naturally dry.

So away I went, mixing the three ingredients in hopes of an awesome and cheap makeup remover.


After mixing the ingredients, here is what the final result looked like:


Seemed simple enough. I waited long enough for the bubbles to settle and then grabbed a cotton ball to try the solution out. I still had a good bit of yesterdays eye makeup on, and I needed to remove it before my shower. (I don't always take it off before I sleep...I'm bad, I know!)

Well folks, I got nothin'. 
Hardly any makeup at all came off when I wiped with the cotton ball and solution.
I was so disappointed!

I'm going to go back to the drawing board and tweak the recipe a bit and see if I can get it to work. I'd love to not have to go buy an expensive bottle of eye makeup remover.

Do you have any suggestions on how to make this work? Perhaps you have your own recipe and you'd like to share it! I'd love to hear from you!

While you're at it, follow me on Pinterest and see what I'm pinning! 
I'm always looking for something new to try!

Monday, October 15, 2012

Do you participate in online surveys for cash?

Have you ever been curious about earning cash through online survey websites? Perhaps you've tried one or two and didn't like your results. Many of them seem like the surveys take way too long to answer, and what's even more frustrating is when you don't qualify for half of the surveys.

I will be one to say that of all of the online survey sites I've been a part of, most of them have been more of a waste of time than they have been beneficial.

However, I do belong to one particular survey site that I have found to be wonderful, simply because all of the surveys take less than 3 minutes to complete and you always qualify for the survey you're given.

PaidViewPoint offers quick and simple surveys that can be completed on the fly, and the pay out per survey is anywhere from $0.10 to $2.00. Once you earn $15.00 in your account, you can cash out through Paypal. I typically receive 1-2 survey opportunities per day from PaidViewPoint, so I am never waiting long to earn a little money.


The time it takes to accumulate $15.00 can take a while, but I'm excited to have the extra cash for the holidays knowing that I spent very little time doing it, and I never once sat though a painfully boring survey that took forever, only to find out that I didn't meet the qualifications.

I encourage you to give PaidViewPoint a try if you're curious about online surveys and earning a little extra spending cash.

Just sign up using this link and start earning money in just a few short minutes!

Are you currently a part of any other survey sites to earn money? What have been your thoughts on them? I'd love to hear about it!


Disclosure: This post contains affiliate links. All opinions expressed are completely my own.


Thursday, October 11, 2012

Funnel Cakes - Sans Fair!

Easy Funnel Cakes without the Fair!

Kyle finally makes an appearance on the blog today!
Believe it or not I'm a pretty good cook, especially when I'm hungry or have a craving for something. 
It's cooling off here in the south and the frequent sight of semis & carnival rides rolling down US231 in Troy, AL tells me it is fair season. My Twitter feed and news feed on Facebook have been blown up in the past two weeks by people going to their county fair, the Alabama National Fair, or the upcoming National Peanut Festival in Dothan, AL. 
Many of the posts elude to their attendance being only for the food!?!

Particularly this dish:
Funnel Cakes!

Well, I'm not a big fan of the fair. 
Motion sickness and heavy amounts of cigarette smoke at most of the events keep me away.

So, without further adieu here's the deliciousness without the hassle!

What you need!

2 Eggs
1 1/2 Cups - Milk
2 Cups - All Purpose Flour
1 tsp - Baking Powder
1 tsp - Salt
Powder Sugar to your pleasing ;-)
Fryer or Frying Pan & Oil
Funnel or something to pour the mixture with in a stream
Tongs
Fingers (all the better to eat with)


Tips & Notes

1. Self-Rising flour will work.. just don't add the baking powder.

2. The first time I made these I used a ladle because I couldn't find the funnel, a Solo cup with a 1/4" hole in the bottom would do fine, or even pouring from a mixing bowl.

3. Cooking times may differ slightly as with all recipes, due to different frying methods and pouring methods. I like using the Frying pan because it is the quickest and I don't like to wait on the grease to heat up in the deep fryer.

4. This mixture will make about 4 cakes, depending on how much batter you use on each. The batter is fine to put in the refrigerator for a few days if you'd like to continue later or just want another one tomorrow. (I wouldn't leave it sitting over a week.) Be sure to mix again after storing as it can separate.

5. Even though the batter looks like delicious cake batter when mixed smooth it does not taste as such and is not recommended to try. 

Here we go...

Step 1: Heat grease to 350 degrees. 
(This can be done in a skillet, frying pan, or deep fryer.)

Step 2a: Mix Eggs & Milks and blend 
Step 2b: Mix Flour, Baking Powder, and Salt in a separate bowl

Step 3: Combine Flour mixture and Milk mixture and blend until smooth
(I did this by hand with a whisk.)

Step 4: Put about 1/2 cup of batter into the funnel and plug the bottom with your finger. With the  funnel a few inches from the grease, allow the batter to pour. Swirl the batter in the grease to achieve the classic funnel cake shape. 

Step 5: Allow funnel cake to fry for about 2 minutes or until golden brown on the bottom, then flip and fry that side another 2 minutes or until golden brown.

Step 6:  Remove from grease and plate, dust the cake with Powdered Sugar while still hot.

Step 7: Please eat this delicious treat before it gets cold!


And another one bites the sugary dust of deliciousness!


It says posted by Laura, but this one's actually by Kyle ;-)

Wednesday, October 10, 2012

Bloggers Wanted ~ LG Smart Magic Bigscreen Event

The LG Smart Magic Bigscreen Event is hosted by Mom Powered Media.

Prize: LG 42" Smart 1080p Edge-Lit LED HDTV with Wi-Fi and Magic Remote

The event dates: 11/5 - 11/26

Free Event ~ Sign-Up Here – Bloggers Wanted LG Smart Magic Bigscreen Event

Tuesday, October 9, 2012

How I updated my wardrobe for less than $2.00!

Everyone loves a good pair of blue jeans, and this season dark blue denim seems to be all the rage. But who really wants to pay $80 or more for a single pair of those trendy denims?? Not this girl!

It's important to me to keep up with the with the latest trends, but it's also important for me to keep within my budget.

This afternoon I looked through my closet and found 4 pairs of jeans that I've had since high school. When I was in high school, faded wash denim was "the thing". They're all broken in and still fit nicely in all the right places, but I couldn't help but feel a little outdated every time I wore them.
Then it hit me. What if I updated their color myself? It'd certainly save a lot of money and I wouldn't have to break in another pair of jeans! So off to Walmart I went. I purchased 1 package of Rit color dye in Navy blue ($1.66). As soon as I got home I went straight to work!


The directions said to fill the drum of the washing machine with hot water. While it was filling, I was to mix the dye in a bowl with 2 cups of hot water. 

Next, I poured the dye mixture into the washing machine with 1 cup of salt. (I'm not exactly sure why the salt is necessary, but I'm sure there's a good reason!)
Then I put all of my faded jeans in the washing machine. I let them set in the water for 30 minutes before continuing with the normal wash cycle.

Finally, I was to dry the jeans in a full drying cycle. While the clothes were drying, I washed out the drum of the washing machine by running a full cycle to see to it that no dye was left behind.

I was SO excited to pull the "new" jeans out of the dryer. I could hardly wait for them to dry!

Here's the final product!

 I'm very pleased with the results! I honestly feel like I have four new pairs of jeans ready for the Fall season!
I'm very tempted to try this with my black clothes and cardigans that have faded over the years.

Do you have any old clothes that could use updating? I encourage you to give this method a try!

Monday, October 8, 2012

Legacy of Clean Stain Treatment Review + Giveaway!!

I have a confession to make. 

I'm hanging my head down in shame as I'm saying this, but....

I'm a messy eater. A terribly messy eater.

Like...I'm the 5-6 napkins at the table is hardly enough kind of messy.
And don't even get me started on how often I spill something on my clothes. It's nearly guaranteed that I will.

So it was no surprise to me that as I sat down to eat a bowl of salsa this afternoon, a dollop of that lovely tomato-y salsa decided to become acquainted with my white t-shirt.

Was I upset? Hardly. Was I worried the tomato stain wouldn't come out? Not at all!
Why you ask?

Because of this magic potion: 
Amway's Legacy of Clean pre-wash stain treatment.
And you guys....this stuff is AWESOME!

Amway has been around since 1959 providing innovative and effective household products to consumers around the country. That very same year, Amway was the first company to ever release an organic liquid cleaner- meaning that its components were biodegradable and didn't harm the environment!

I'm all for using products that are safe for my family as well as safe for the environment. I just love that one of Amway's priorities is the environment and has been for years.

Allow me to share with you just how I solved my salsa mishap using Legacy of Clean stain treatment.

Here is the mess I made on my white t-shirt. Lovely, right?
The directions say to spray all stains and allow to sit for 5 minutes. The liquid is very thick and goes a long way. The smell is amazing as well!
After just 5 minutes of it sitting, I threw my t-shirt in with the rest of my laundry.
After one wash cycle and about 30 minutes in a dryer my shirt came out bright and clean...with no sign up a tomato stain in sight!

Hooray for no more tomato-y salsa stain!
I've kept this product in my house for going on 2 years now. It is the ONLY stain treatment I use, and it's the only stain treatment I WANT to use. I absolutely love Amway and their whole line of Legacy of Clean products. They're absolutely fantastic!
The Legacy of Clean pre-wash stain treatment retails for only $5.85- what a steal!
And
one lucky Settled Down in a College Town reader will WIN their own full-sized bottle of the stain treatment!
Woo-hoo!
Just enter using the rafflecopter entry form below. The first entry is MANDATORY and will be verified.
Prize is available to US readers only.


a Rafflecopter giveaway

Saturday, October 6, 2012

T-shirt quilts: The perfect way to turn your old tees into a keepsake!

Ever wondered what to do with all of your old t-shirts that you just can't seem to get rid of? Often our tees connect us to a wonderful memory, whether it was from your high school years, your college days in a sorority or fraternity, or maybe you were a part of a rec league that made it to the state playoffs.

 Either way, no one wants to toss those memories in the trash, and we certainly can't wear those memories until their threadbare (which I'm totally guilty of)!

A few months ago I came across a wonderful website called Mominizer, and they specialize in capturing those special memories and turning them in warm and cozy t-shirt quilts and pillows! 

Just look at my beautiful quilt they made from my old sorority t-shirts!

What's really cool about these quilts is that they're guaranteed to be one-of-a-kind! No one else will have a quilt just like yours! Quilts range in size from 9 squares (lap quilt) to as large as 30 squares (full size memory quilt.

Be sure to check out her custom tee pillows as well! These would make FABULOUS gifts for any occasion...especially high school and college graduates!


Tuesday, October 2, 2012

You're never fully dressed without a smile..and a hair bow! (Giveaway!)

From the last couple of posts, you may have noticed that I'm quite a big fan of DIY projects and all things crafty. If you follow me on Pinterest, you've probably noticed that I'm always pinning something new to try or recreate. 
About 2 years ago, I came across a tutorial that really sparked my interest, and eventually turned into a hobby for me. Any guess on what is was?

Hair bows.

That's right. Hair bows.

Once I made one, it wasn't long before I made 100. I was a hair bow maniac! And it was actually quite a strange hobby for me, seeing as how at the time I was a college student living in a sorority house and had no little girl of my own to make these hair bows for. Pretty random, right?!

Well, eventually I did turn around and sell these hair bows and turned my hobby into something a little more productive.

Being from the south, there seems to be an unwritten rule about hair bows. A little girls outfit just isn't complete unless she has a matching bow- and I couldn't agree more! As a child, my mother saw to it that I always had a hair bow in my hair, and I can only imagine that I'll be the same way!

So today I'd like to share my hobby and give away one hair bow to one lucky Settled Down in a College Town reader!

Hooray for our first giveaway!

The lucky winner will have their choice of one of the hair bows pictured below:


Just fill out the rafflecoptor entry form below!
All entries will be verified. Giveaway will end on October 15th! Open to US readers only.
a Rafflecopter giveaway

Tutorial Tuesday: DIY Wreath on the Cheap!

Fall is in the air!

Fall is my absolute favorite time of year. The brisk air, falling leaves, and beautiful shades of browns and oranges all make the Fall season so wonderful and cozy.

With Fall comes lots of fun and festive decorations, and today I'm going to share with you how to make a really simple Fall wreath using only 3 items.


What I really love about this wreath is that it requires absolutely NO sewing and NO hot glue! Yay!

Here's what you'll need:

2 (25x6) spools of orange tulle
1 small wreath (I used a wicker wreath from the Dollar Tree-$1.00)
Ribbon of your choice for hanging


Here's how to do it:
(if you can tie a shoe, you can totally do this!)

Cut tulle into 10 inch strips. 
*If you have a thicker wreath, you may want to use a little more than 10 inches. This is a judgement call*
Tie each strip onto wreath in a square knot (just like you're tying a shoe).
 Continue that process until you've covered the whole wreath.
Fluff the tulle
Use ribbon to hang the wreath. You can even add a bow if you'd like!

See? Totally simple! And it cost right around $7 total to make!

What's even greater is that you can use any color tulle for any holiday. I plan on making one for Christmas as well.

I'm so excited to hang my wreath on our front door. I love decorating for Fall!
How do YOU decorate for Fall? Do you have any simple craft ideas that you've tried? I'd love to hear about them!

Saturday, September 29, 2012

Let's Talk Pinterest!


Whether you're a part of the Pinterest obsessed or just a casual Pinterest passerby, I'm sure at some point you've been lured in by it's craft-tastic ideas, recipes, and tutorials. Perhaps you've even broken out the old glue gun and attempted a project or two...or twenty. I mean, let's be completely honest...the world is a better place now that we know to save our paper towel rolls and coffee cans! Right?!


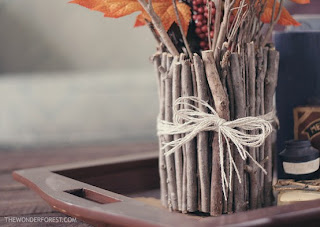
I'll be happy to admit that I've had some great successes with Pinterest. It helped me stay on budget with my wedding by encouraging me to make a lot of the items myself. I'll also admit that I've had some total fails when it comes to Pinterest. Today I'm going to share a project with you that I attempted for my wedding. It's a rustic-looking twig-vase type thing, and It's pretty darn cute if you ask me. Its been a pretty popular craft on pin boards lately, and I'm sure many of you have seen it or something similar. 

Here's the Pinterest version:
Cute, right?

Before I share my version with you, I will say this: It was a win-fail for me. It was a win because it still turned out cute, but it was a pretty big fail because my execution wasn't great. I didn't follow the tutorial exactly. Actually, I improvised quite a good bit. I will share with you, though, how it should have been done. These would make CUTE table decorations for Fall!

Here's my version:
Not too bad! (I think)

We put small tea lights in them instead of flowers. These vases gave off the perfect country-chic vibe we were shooting for.

Overall the craft was pretty simple, but follow the directions I'm about to give you! Improvisation can be a great thing, but it can also be disastrous. Trust me.

Here's what you'll need:

Medium-large coffee can or any other aluminum can
twigs (I found mine in my backyard)
Small handsaw for cutting the twigs
black poster board or construction paper
 low-temp hot glue gun
scissors
twine
Instructions:
  1. Clean out coffee can of any debris and of any labels. (Here's the first part where I messed up. I didn't use a can. I used a glass vase. Hot glue will stick to glass, sure, but not for long! The surface of glass doesn't have enough grip for the glue!)
 2.Cover the exterior of the can with poster board. (Provides extra grip for the glue and twigs to stay on to and also hides any aluminum from peaking through. *very important*)
3. Carefully use the handsaw to cut twigs at an even length to your liking. (I also did not do this. I chose to break the twigs with my hands. Naturally, they were all different and wonky looking lengths. I didn't mind that part, however, I did injure myself breaking the sticks. Pinterest can be the cause of many blood, sweat, and tears my friends!)
4. Stream a line of hot glue on the can first, then place the twig on top of the glue. This will help decrease messes as opposed to you trying to glue the twig first. (Some of your twigs will not be perfectly straight. It may help you to try and line them up in a way that you like before gluing,)
5. Once you've glued all of your twigs onto the can, finish with a cute bow made from twine or whatever string-material you may have.
Voila!


So there you have it, folks! My first attempt at a Pinterest craft was a win-fail, but it was perfect for my occasion and still came out cute. I want to hear about YOUR Pinterest experiences!
From time to time I'll be sharing with you tutorials I've found on Pinterest and how they worked out for me.

Until then, follow me on Pinterest for cute and unique craft ideas! You'll get hooked I'm sure!

Or gain a little bit of "pinspiration" here!